Tuesday, April 8, 2014

visual awareness and photography

Visual awareness, how do you develop your own ability to create artistic photographs? This is a subject that is oft discussed, written about, and yet no one has come across an effective method to share with budding photographers on how to "see photographically" either in the print or spoken word. As a photographic community, we have largely failed in communicating this mission of helping you to see creatively.This is usually what happens and we see something that attracts our attention or something that looks interesting to photograph and then we are stopped dead in our tracks or have that deer in the headlights look like, now what?  We then go through the contortions, kind of like working through a technical maze and we hit the camera bag.  Out come a contortion of lenses, which are zoomed in or out, moved up or down or side to side, and not satisfied we pull out every gadget and gizmo know to photography.  If this is the case, then you have not learned "how to see." and you have failed to capture what attracted you to the scene in the first place. ?  Photography is about light, of course, but it is also about vision, either real or perceived.  Everyone's vision is different and we all see the world differently, but how do you translate your vision into the photograph you have pictured in your mind?  That is the million dollar question and one you will struggle with your entire photographic endeavors now and in the future.  So, where are images created and how do you develop your visual awareness?  It has something to do with what you "see" not what you "look at."  I call the what you look at photography, drive by photography which essential means you stop and take a snapshot, not putting in any thought or creativity into what the images is about and the meaning you are trying to portray with this image.  You mistakenly think that you can Photoshop your way to outstanding photos and technology has been a huge curse to creative photography because we focus on the technology not on the vision or as Ansel Adams once said, "There is nothing worse that a brilliant image of fuzzy concept." Remember that photographs are created by us and we have a purpose in taking them and as such effective photographs are about human eyes and brain, heart and soul.  For example, in the photograph above as soon as we pulled off the scenic overlook I immediately told Jamie, there is a photograph there.  I saw a series of three leafless trees with such interesting patterns that I knew I wanted to create an image that in all truthfulness isn't that colorful but carries with it tons of visual design appeal.  I knew I wanted a soft focus image to blur the background and to focus in on the most interesting branch pattern which meant using a longer telephoto lens. So I guess the first component of learning to see is to learn basic photographic techniques such as depth of field, etc.  The next step is to SLOW DOWN!!!!! What in the heck is your hurry when photographing nature.  The photo of the bloodroot flower that is not open is a case in point.  It was a cloudy day, the flowers weren't open and there was a nice patch of bloodroot and as I scanned the flowers I noticed that one plant in particular was kind of different in that the leaf wasn't curled like normal and that the flowering stem was curved because this plant was coming up through a leaf that had restricted it from fully opening.  Hence, by turning my attention to this particular plant was I able to isolate the subject, pick the right type of background, appropriate depth of field, and exposure and pre-visualized what the image would look like. So in a very real sense, this is more of a artistic representation, not a literal interpretation, of this flower, much in the mode of a Georgia O'Keefe flower.
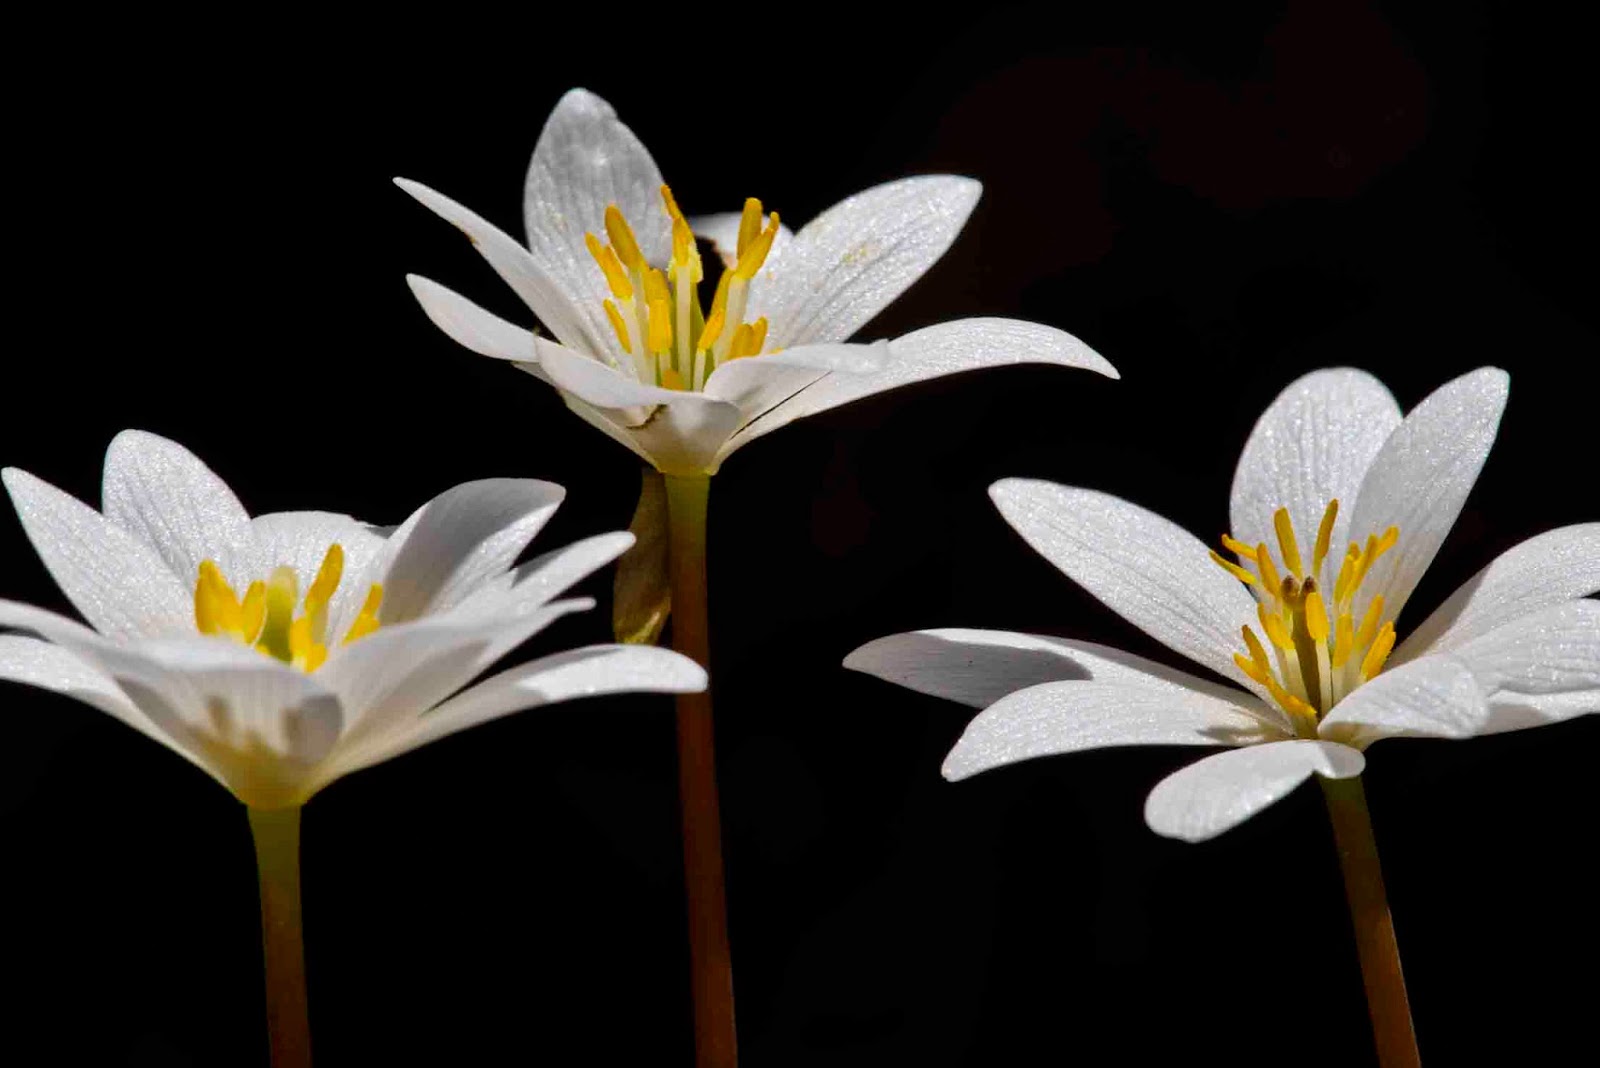
The next image of bloodroot is also not a literal interpretation of the showy flower, which I have tons of images of.  Rather, what attracted me to this image was the lavender color under the petals of one flower as it contrasted with the other "normal" flower and only by altering my perspective, ie. shooting from under the flower with sunlight streaming through the petals, was I able to achieve the image I was looking to get.  Patience is also a virtue in this endeavor because in each case it took at least 30 minutes to get my camera and tripod set up and maneuvering the equipment to get the composition that was appealing.
The next step in learning to see is to look at, and I mean critically look at photography books and critique each image and ask yourself "why does this image work?" Is it the light, composition, subject, or a combination of each?  You can also pick up a visual design book and learn about composition, use of color, light, etc. and become more proficient in understanding the concepts and principles used to create the image. Then visit art museums and galleries and look at art, all kinds, styles, all periods, and attempt to figure out what you like and what you are attracted to visually.  Finally, practice, practice, practice.  There is no substitute for spending time in the field photographing and don't be afraid to experiment or try new approaches because they are a learning experience and you can learn from your mistakes. In the next few posts I will explore this concept of learning to see as it relates to visual design and composition.  Until then, get out and enjoy the spring wildflowers while they are here for this fleeting moment.

Monday, March 31, 2014

Chasing the light for spring wildflowers, using diffuse light to highlight color.

Spring is the season for those delicate ephemeral wildflowers and one of the most spectacular things about this time of the year is the bright colors the flowers bring to life.  How do you emphasize these colors?  The answer is to photograph using the correct type of light.  In previous posts I have discussed the use and manipulation of spectacular light and this time I will cover the soft, even, mellow light we call diffuse light that occurs before sunrise or after sunset, in the shade or on overcast days.  Think of it this way, spectacular light comes from a light bulb and we use a shade over the light bulb to even out the harshness and shadows and evenly light the entire area.  I often use this analogy about using light for flowers.  When you want to feature textures and strong bold features we use and manipulate spectacular light which we often do when photographing men (think Marlboro Man here).  However, when photographing women (and flowers are often given feminine stature) we do not want to emphasize those strong features and use diffuse light, bounced light, or something that reduces contrast, shadows and allows for the natural beauty to shine through.  This type of light also intensifies the color saturation with less contrast.  There are several ways to access this type of light and one of those is to get up early or stay up late or shoot when the sun disappears behind a cloud.  Or perhaps shooting on a cloudy, overcast day or in the fog.  You can create your own shade but using the same deflector used to bounce spectacular light or you can carry an old white or muslin cloth and drape it over the area on a bright sunny day to diffuse the light.  Other than strong color saturation the other reason to consider using this light is to make better use of colors that blend together and produce nice soft color harmonies.
Notice how the light pink azalea flowers blend and harmonize with the light lavender of the iris with low contrast of the browns and greens, which are neutral colors?  In the next image, which is a soft focus of hepatica unfolding, notice how the light blue and green blend nicely and how the background is a bit deeper shade of the hepatica and serves to highlight the hepatica flowers?  This was accomplished by a double exposure whereby I opened up and didn't focus on any particular part of the image but just the color and then did a second exposure over the top of the individual flowers to achieve this nice color harmony because the background was a dreary blackish, brownish color which took away from the delicate flower blooms.

 As you head into the field this spring to photograph wildflowers, keep this light information in the back of your mind and unleash the creativity within you and experiment with exposures, light, and even composition. You might even end up with something spectacular.

Monday, March 17, 2014

Manipulating natural light for wildflowers

.
In the last post I describe the difference between spectacular and diffuse light and gave some examples of how spectacular light can be used to make the flower subject standout.  In this post I will demonstrate a simple technique that you can use to manipulate natural spectacular or diffuse light to make a subject standout and provide you with options for what lighting you think is best.  The technique I am discussing is nothing more than bouncing light with a reflector or some other shiny object and controlling the background with the use of shade, which can be created with a reflector as well.  Lets use the pink lady slipper orchid as the subject.  The first shot is with diffuse light and a large reflector was used to keep light off the background to darken it about 2 to 3 stops.
Note the even illumination and excellent color saturation of the flower and leaves.  This is a typical response when shooting under these conditions.  The use of the reflector shading the background helps the subject standout.
Now in the next image, a reflector was used after the sun came out from behind the clouds (early in the morning soft light) and illuminated the entire subject.  But how on earth did the flower get illuminated with spectacular light on the opposite side where the light came from?  A reflector was used to bounce the light back onto the flower.
In this case you will notice the good color saturation but the background, even though still darkened with a reflector hasn't gone completely dark and the subject is evenly illuminated with very faint shadows. You notice the sun is coming from the right side of the flower and lets see what it looks like when the spectacular light is placed behind the subject (and in this case a more close-up of just the flower).
The next image for comparison was taken with backlighting and the use of a reflector (and just a little different angle) which shows a more even illumination of the subject.

The final image was taken with just standard diffuse light and no use of reflectors at all.


Obviously all the images of the same flower or plant are quite different with respect to lighting and no one is better than the other.  Each person will respond differently to each different image.  They were obviously taken and posted (not in exact order taken) as when I first got to the site the flowers still had dew on them but by the time I left several hours later, the dew had evaporated but I still had nice early morning light.  As you go out to photograph wildflowers this spring keep this little tip in the back of your mind.  A reflector doesn't have to be an expensive piece of fabric from the photo store (I carry one that is translucent - usually for shading) and then a small one with a gold and a silver side for reflection to bounce the type of light I am looking for which gives me the option of gold, silver, or white with those reflectors) it can be a piece of aluminum foil, a beer can in the woods, a small mirror, or even something like a bright piece of paper.  Be creative and have fun.


Tuesday, March 11, 2014

Painting with Light

Light, in all its forms, is the most essential element that is required for photography.  Of course it is visible light for which allows us to see with the human eye as well.  Light is nothing more than electromagnetic wavelength visible to the human eye. The wavelength ranges from infrared to ultraviolet or about 400 to 700 nanometres. This electromagnetic wavelength is made up of photons, little energy packets causing changes in molecular bonding or chemistry allowing us to see.  As photographers we take light for granted, but we shouldn't for the more you know about and understand light, the better you are at harnessing it in a positive method to improve your images.We say that there are various sources of light, the sun, a flash, a lightbulb, etc. and we further say that light has a direction from which it emanates, in front of the subject, to the side of the subject, in back of the subject, from on top or on bottom.  Finally we refer to light and color in. terms of its temperature, warm versus cold (that is why you camera has different settings for different types of light as it relates to temperature), daylight versus overcast. etc.  Light and color also has a luminance (brightness) and a hue (color palette), and intensity (saturation).  The new digital cameras are designed to take advantage of all these various aspects of light, yet I am amazed at how individuals just get their camera out of the box and start shooting, without giving any thought to the light profiles saved in the camera for use in various situations.  We should and this post, the first of several on light, will hopefully demystify the concept of light and camera custom settings.

From a very practical standpoint for photography there are only two types of light, spectacular and diffuse.  Spectacular light emanates from a single source and is harsh, strong, pure and directional.  It often produces strong contrast with dark shadows. Human skin tones are usually never flattered using this light which is why you will see photographers using deflectors and other efforts to manipulate the subject when shooting outdoors in the middle of the day. This light can be harnessed effectively to make dramatic nature images or it can be a hindrance, such as the old adage of keeping the sun behind your shoulder when composing a photograph.  Because spectacular light is directional, you can take advantage of this property by taking some time to think about your subject and how it can be highlighted with spectacular light.  Everyone has probably heard of "Rembrandt" lighting where there is a rim of light behind that outlines the subject and provides a glow.  This type of light arises when the light source comes from behind the subject.  Very often however, another source of light is used as the primary light to evenly light the subject (usually diffuse light).  The point is that by moving around the subject you can create different effects by harnessing this type of light to make the subject standout from the background.

Since spring is just around the corner perhaps the best way to showcase this is by a flower example or two.  In the case of the bloodroot, the source of light comes from directly above the subject (this means lying on your belly looking upward) and you will notice the strong shadows on some of the petals.  You will also notice that there is a dark background because it is absent of direct light (and it is in the shade which is naturally darker than the surroundings - again as a result of strong spectacular light).  The lighting in this case serves to emphasize these flowers and nothing else. Also notice the high contrast of this image and the pure bright white and yellow colors (make sure you always balance the light to white which is easy in this case with these white petals).

The image of this hepatica is using the same technique and was taken the same day.  Note where the shadows arise.  In this case the lighting brings out the color of the flower but more importantly the hairs on the stem and sepals of those yet to open.  One key thing to remember when using this technique is to keep the source of light from hitting the front element of the lens.  A lens shade or hood is essential but in some cases you can still get lens flare and I have used my hand, a baseball cap, a leaf and a whole lot of other things to keep the light from hitting the front element.
Finally here is an image using the "Rembrandt" lighting with sandhill cranes whereby the light is creating this halo effect around the birds.
The next post we will begin to discover diffuse light, particularly with use on wildflowers.

Monday, February 24, 2014

Spring maybe coming soon? The peepers are popping so it must be true.

Set your calendar to the third week in February and each year you can count on the spring peepers greeting you with the melodious calls that fill the evening and night (and even overcast days) air.  That beautiful sound, a series of single high pitched whistles ("peep" "peep" "peep").  Whats really cool is that the singing by the males usually occurs in trios when they reach breeding age (three years old) and the louder you peep, the better your ability to attract true love (or at least the opportunity to breed) and the bigger you are the better your ability to mate and survive (Girls like bigger males in this case).  When the singing commences it tells you that they have emerged from hibertation and winter is almost gone and spring will be arriving soon.Each female lays between 800 to 1,000 eggs that will hatch in about 6 to 12 days and the larvae (tadpoles) transform into adults during the month of July. The spring peeper (Psuedacris crucifer) gets its name from the distinctive cross or X on its back.  This is a small frog, ranging up to about an inch in length and coloration can vary from olive to even slightly yellowish.  Look for the x on the back and the dark bands on the legs for better identification.  This is a frog of wet woodlands and small ephemeral, shallow ponds or pools without fish.  Like most frogs, these little guys are primarily active at night and this means if you are going to photograph them in their natural habitat, flash photography will be used.  The keys to using it successfully are to diffuse the light so you do not get such strong highlights and dark shadows and to make sure the eye is sharp and in focus.


Monday, February 17, 2014

Looking for patterns in nature photography


Patterns are nothing more than repeating forms, shapes, objects, or colors that are either arranged in order or randomly throughout an image.  Patterns add interest to nature photographs because they are quite pleasing to the eye because they bring visual rhythm and harmony and seek to move you through an image like the repeating notes or phrases in a musical score. One of the keys to using patterns is to emphasize the pattern, not the surroundings and this requires us to slow down, stop, look, listen and smell the roses as they say.  I will never forget when I was leading a group of nature photographers on an outing to photograph painted trillium and the were so excited at seeing hundreds of them that they stopped looking, listening, slowing down and delved right into those big beautiful showy flowers.  But every single one of them passed up the shot I liked best from the outing which was a single southern "confederate" violet growing in a patch of tassel rue (just the leaves).  There was this great pattern that had been "interrupted" by that single flower.  I still like that image today. So the first method of using patterns effectively is to emphasize the pattern as show in the close -up of the lesser purple fringed orchid above. This is also an example of a regular pattern. The other effective method of using patterns is to "break" the pattern with something that is different as in the case of the purple fringed orchid "breaking" the pattern of the ferns in the image below.
Now this is where other aspects of composition might come into play and you can consider the rule of thirds when composing the image in the viewfinder.  In this case the organization of the image placed the whole flower raceme in the upper right quadrant of the photo.
The last type of pattern is called an irregular pattern where the objects are randomly placed, not particularly ordered, but close enough to give the sense of a pattern. When using this type of pattern it is best to fill the frame with the subject. Since spring is rapidly approaching now is the time to begin planning those outings in the field and I suggest you think about looking for more patterns with the flowers to create more visually enticing images, but don't forget to do the close-ups and portraits too.


Monday, February 10, 2014

Improving your photography by focusing on the subject

I give powerpoint programs all over the state and I give lots and lots of them (or at least I used to).  One of the most common questions that I get asked is what is the one thing I can do to improve my photography?  That is a difficult question to answer because lots of things need to be considered before answering that simply question.  For example, is the image properly exposed and have the appropriate contrast?  Is it in focus (or at least the critical part of the image)?  What are the lighting conditions?  You get the point.  Once the basic questions have been answered, the biggest single thing that can improve your photography is to tnk about what you are trying to say with this image?  What is the point of taking a photo because it can range from simply documenting a situation to trying to create some emotional impact.  Much of the public believes you can fix everything in photoshop or some other post processing software and there is this entire group of tech savy folks, who can do amazing things with software.  For example, the new hottest thing is something called HDR which is a method of expanding the exposure range to get more detail in highlights and shadows.  But most of the HDR stuff I have seen are not accurate representations of what happened in the real world.  In addition, I think many people have gotten so used to over-saturated images on the web (and those aren't real either) that we come to think of it as the norm.  Or even adding or changing something significant about the image (check out the latest Audubon magazine about a fellow who inserted one owl for another and was disqualified from the competition). Which gets us to the simple question, what is the one thing I can do to improve my photography?  Well the answer is subject, subject, subject and more subject.  Think about what the subject is and how you can emphasize the subject and how that relates to the purpose of the image.  This can apply even to those candid family photos and you probably have them with the lamp post or floor lamp splitting someone's head or growing out of their head, or having people stand too close to the wall so that the shadows take away from the people?  So remember what is the purpose of the image and how do can you emphasize your subject and the best advice is to keep it simple.  Keep it elegant and don't have a lot of clutter or distractions that take away from the subject.  Below are two images I took yesterday with friends in Edmonson County Kentucky on Indian Creek (private property).  The first image is more of a portrait of the waterfall where the waterfall is definitely the subject of the photograph.  The second image is a landscape view, putting the waterfall into the perspective of where it occurred and the various pieces of a puzzle.  In the landscape photo, I took great care where I set up the camera and tripod and what lens to use because upstream there was a bunch of dead trees scattered all over the creek.  By selecting this location and the focal length lens I used, I was able to effectively keep out the distracting elements and get a unified image where the waterfall is part of the scene and not the entire subject.